First stop the apf
/etc/init.d/apf stop
Then, flush ip tables and remove all existing apf files even in cron job
iptables -F
rm -rf /etc/apf
rm -rf /usr/local/sbin/apf
rm -rf /etc/rc.d/init.d/apf
rm -rf /var/log/apf_log
rm -rf /var/log/apfados_log
/sbin/chkconfig --level 345 apf off
Now remove this cron job
vi /etc/cron.daily/fw
Find and Remove this line:
/etc/rc.d/init.d/apf restart >> /dev/null 2>&1
Friday, May 1, 2009

How to Install APF (Advanced Policy Firewall)
APF is a policy based iptables firewall system designed for ease of use and configuration.When it comes to security, there is no such thing without firewall. when you buy a new dedicated or vps server, atleast make sure you install a firewall to protect your server from various intrusion attacks. Within minutes you can set up your firewall up and running. APF firewall is one of the popular and easy to setup IP tables based firewall for Linux servers. It also has additional features like prevention from DoS attacks.APF is developed and maintained by R-fx Networks: http://www.rfxnetworks.com/apf.php
Be careful on setting up the firewall on what ports to open and what not. If youarent sure, you may lock yourself out.
Be careful on setting up the firewall on what ports to open and what not. If youarent sure, you may lock yourself out.
Installation
1)Login as root user
2)Download the APF Source
For downloading apf source code click here
or in command prompt type the following command,
wget http://www.r-fx.ca/downloads/apf-current.tar.gz
3)Extract the tar.gz
tar -xvf apf-current.tar.gz
4)Enter the APF directory
cd apf-current/
5)Run install code
./install.sh
After installation, you have to manually configure your firewall settings on what ports to open and what to block. You can edit the configuration file located in /etc/apf/conf.apf
Installed paths:
Configuration File: /etc/apf/conf.apf
Binary: /usr/local/sbin/apf
Start/Stop: /etc/init/d/apf (start|stop|restart)
Log: /var/log/apf_log
Antidos conf file: /etc/apf/ad/config.antidos
You can also use commands in the command line
apf -s (start)
apf -r (to restart)
apf -f (to stop)
6)Modify the APF config File
vim /etc/apf/conf.apf
First look for the line that says
Leaving this option as “1″ will disable your firewall after 5 minutes, so make sure to change it to “0″.
So replace 1 eith 0 and it look like this:-
DEVEL_MODE=”0″
Next, take a look at the allowed inbound ports. You should see something like
IG_TCP_CPORTS=”22,80,443″
Notice that port 22, the default SSH port is open. We want to change this to the port we gave SSH earlier. You can leave port 80 (HTTP) and 443 (HTTPS) open if you plan on running a website.
If you want to open any port, you have to give an entry in to the above place.
By default, APF will not filter outbound traffic but if would like to change that look for the following line
EGF=”0″
And change this value to “1″. On the line directly below it you should see the allowed outbound ports
EG_TCP_CPORTS=”21,25,80,443″
Change these if you have enabled outbound filtering and save the firewall config. Now we should add the firewall to start when we reboot our VPS and enable it
chkconfig --add apf
chkconfig --level 345 apf on
/etc/init.d/apf start
APF Firewall for VPS Servers:
If you are running apf firewall in VPS, there is a possibility that you will get "eth0: Device not found". Instead you have to make settings in the configuration file.
Find the following lines and change the values like below.
IFACE_IN = "venet0"
IFACE_OUT = "venet0"
DEVEL_MODE="1"
SET_MONOKERN="1"
SET_MONOKERN="1"
(The above line is important to have "1" if you are in VPS server as otherwise you will get unable to load ip tables module")
Wednesday, April 29, 2009
How to Install FFmpeg in Linux
FFmpeg is a very fast video and audio converter. It can also grab from a live audio/video source. FFmpeg is so important if you are planning to run a video website with streaming with conversion of video files to different video formats. This blog is intended for Centos/Redhat versions of Linux where any novice user can install ffmpeg without compiling the source which is a more traditional way of installing the FFmpeg software on linux servers. In this blog i will show you the easy way to install ffmpeg and ffmpeg-php (php extension) with just yum rather than compiling ffmpeg from source files.
Installation
First you need to add a file in yum repository directory for dag packages installation. For this edit the following file:
Vi /etc/yum.repos.d/dag.repo
add the following contents to the file,
[dag]
name=Dag RPM Repository for Red Hat Enterprise Linux
baseurl=http://apt.sw.be/redhat/el$releasever/en/$basearch/dag
gpgcheck=0
enabled=1
Then enter the command,
yum install ffmpeg ffmpeg-devel
To check what audi/video formats are supported
ffmpeg -formats > ffmpeg-format.txt
Open the ffmpeg-formats.txt to see the ooutput
D means decode
E means encode
V means video
A means audio
T = Truncated
Installation of FFMPEG-PHP Extension
FFmpeg-php is a very good extension and wrapper for PHP which can pull useful information about video through API interface. Inorder to install it you will need to download the source file and then compile and install extension in your server.
For downloading the source tarball click here
or
wget http://sourceforge.net/project/downloading.php?group_id=122353&filename=ffmpeg-php-0.6.0.tbz2&a=55737530
Extract the souce tarball.
tar -xjf ffmpeg-php-0.6.0.tbz2
cd ffmpeg-php-0.6.0/
phpize
./configure
make
make install
Editing PHP.INI
Once you have done that without any problems then you will see the php extension file /usr/local/lib/php/extensions/no-debug-non-zts-20060613/ffmpeg.so and you will need mention that extension in php.ini file
vi /usr/local/lib/php.ini
Put the below two lines at the end of the php.ini file
[ffmpeg]
extension=ffmpeg.so
Then restart the server
service httpd restart
To check whether ffmpeg enabled with php, point your browser to test.php file. It should show the confirmation of installed ffmpeg php extension
// #test.php
phpinfo();
?>

If any case the ffmpeg does not show in the phpinfo() test make sure that php.ini path to ffmpeg.so is correct. Still the problem occures, the reason could be you might be using older version of ffmpeg-php which is buggy. just download the latest version of ffmpeg-php sourse then complile it.
Common Errors
1. If you get command not found error for phpize, then you will need to do yum install php-devel
2. If you get error like "ffmpeg headers not found" while configuring the source.
configure: error: ffmpeg headers not found. Make sure ffmpeg is compiled as shared libraries using the --enable-shared option
then it means you have not installed ffmpeg-devel packages.
To Fix: Just install ffmpeg-devel using
yum install ffmpeg-devel
3. If you get an error like shared libraries not found problem and the program halts in the middle, then you must specify the ffmpeg installed path explicitly to the ./configure.
configure: error: ffmpeg shared libraries not found. Make sure ffmpeg is compiled as shared libraries using the --enable-shared option
To Fix:
1. First find out the ffmpeg path with ffmpeg --help command. The prefix default path should be like /usr/local/cpffmpeg
2. Configure the FFmpeg-php with --with-ffmpeg option
./configure --with-ffmpeg=/usr/local/cpffmpeg
That should resolve the problem!
Sunday, April 26, 2009
Troubleshooting Nagios
There may be a number of potential problems while configuring Nagios. If you see an error like this,
1)Connection refused by host:
You get the above error, If you don't put the correct IP address in the nrpe.cfg file on the client, or if you do it correctly but forgot to restart NRPE on the client.
2) NRPE: Command 'check_users' not defined
Indicates that you didn't define the commands you wanted, again on the client, or you didn't restart NRPE on the client after you defined them.
3)NRPE: Unable to read output
Usually means that the path to the plugin to run is incorrect on the client. If you change it, remember to restart NRPE again.
4)The check_nrpe plugin returns "CHECK_NRPE: Socket timeout after 10 seconds" or"Connection refused or timed out"
This error can indicate several things:
The command that the NRPE daemon was asked to run took longer than 10 seconds to execute. This is the most likely cause if the error message was "CHECK_NRPE: Socket timeout after 10 seconds". Use the -t command line option to specify a longer timeout for the check_nrpe plugin. The following example will increase the timeout to 30 seconds:
/usr/local/nagios/check_nrpe -H localhost -c somecommand -t 30
The NRPE daemon is not installed or running on the remote host. Verify that the NRPE daemon is running as standalone daemon or under inetd/xinetd with one of the following commands:
ps axuw | grep nrpe
netstat -at | grep nrpe
There is a firewall that is blocking the communication between the monitoring host (which runs the check_nrpe plugin) and the remote host (which runs the NRPE daemon). Verify that the firewall rules (e.g. iptables) that are running on the remote host allow for communication and make sure there isn't a physical firewall that is located between the monitoring host and the remote host.
5)The check_nrpe plugin returns "CHECK_NRPE: Received 0 bytes from daemon. Check the remote server logs for an error message."
First thing you should do is check the remote server logs for an error message. Seriously. :-) This error could be due to the following problem:
The check_nrpe plugin was unable to complete an SSL handshake with the NRPE daemon. An error message in the logs should indicate whether or not this was the case. Check the versions of OpenSSL that are installed on the monitoring host and remote host. If you're running a commercial version of SSL on the remote host, there might be some compatibility problems.
6)The check_nrpe plugin returns "NRPE: Command 'x' not defined"
This error means that you didn't define command x in the NRPE configuration fileon the remote host. On the remote host, add the command definition for x. See the existing command definitions in the NRPE configuration file for more information on doing this. If you're running the NRPE daemon as a standalone daemon (and not under inetd or xinetd), you'll need to restart it in order for the new command to be recognized.
7)The check_nrpe plugin returns "NRPE: Command timed out after x seconds"
This error indicates that the command that was run by the NRPE daemon did not finish executing within the specified time. You can increase the timeout for commands by editing the NRPE configuration file and changing the value of the command_timeout variable. If you're running the NRPE daemon as a standalone daemon (and not under inetd or xinetd), you'll need to restart it in order for the new timeout to be recognized.
1)Connection refused by host:
You get the above error, If you don't put the correct IP address in the nrpe.cfg file on the client, or if you do it correctly but forgot to restart NRPE on the client.
2) NRPE: Command 'check_users' not defined
Indicates that you didn't define the commands you wanted, again on the client, or you didn't restart NRPE on the client after you defined them.
3)NRPE: Unable to read output
Usually means that the path to the plugin to run is incorrect on the client. If you change it, remember to restart NRPE again.
4)The check_nrpe plugin returns "CHECK_NRPE: Socket timeout after 10 seconds" or"Connection refused or timed out"
This error can indicate several things:
The command that the NRPE daemon was asked to run took longer than 10 seconds to execute. This is the most likely cause if the error message was "CHECK_NRPE: Socket timeout after 10 seconds". Use the -t command line option to specify a longer timeout for the check_nrpe plugin. The following example will increase the timeout to 30 seconds:
/usr/local/nagios/check_nrpe -H localhost -c somecommand -t 30
The NRPE daemon is not installed or running on the remote host. Verify that the NRPE daemon is running as standalone daemon or under inetd/xinetd with one of the following commands:
ps axuw | grep nrpe
netstat -at | grep nrpe
There is a firewall that is blocking the communication between the monitoring host (which runs the check_nrpe plugin) and the remote host (which runs the NRPE daemon). Verify that the firewall rules (e.g. iptables) that are running on the remote host allow for communication and make sure there isn't a physical firewall that is located between the monitoring host and the remote host.
5)The check_nrpe plugin returns "CHECK_NRPE: Received 0 bytes from daemon. Check the remote server logs for an error message."
First thing you should do is check the remote server logs for an error message. Seriously. :-) This error could be due to the following problem:
The check_nrpe plugin was unable to complete an SSL handshake with the NRPE daemon. An error message in the logs should indicate whether or not this was the case. Check the versions of OpenSSL that are installed on the monitoring host and remote host. If you're running a commercial version of SSL on the remote host, there might be some compatibility problems.
6)The check_nrpe plugin returns "NRPE: Command 'x' not defined"
This error means that you didn't define command x in the NRPE configuration fileon the remote host. On the remote host, add the command definition for x. See the existing command definitions in the NRPE configuration file for more information on doing this. If you're running the NRPE daemon as a standalone daemon (and not under inetd or xinetd), you'll need to restart it in order for the new command to be recognized.
7)The check_nrpe plugin returns "NRPE: Command timed out after x seconds"
This error indicates that the command that was run by the NRPE daemon did not finish executing within the specified time. You can increase the timeout for commands by editing the NRPE configuration file and changing the value of the command_timeout variable. If you're running the NRPE daemon as a standalone daemon (and not under inetd or xinetd), you'll need to restart it in order for the new timeout to be recognized.
Saturday, April 25, 2009
Adding more services to the Nagios
Monitoring Host Configuration:
Define the remote host name in client.cfg
Edit /usr/local/nagios/etc/objects/remotehost.cfg and append the following lines:
define host{
use linux-box
host_name remote_host
address ipaddress of remote_host
check_command check-host-alive
contacts nagios admin,cliectcontact
}
Next define contact name and contact goup name inn same file
define contact{
contact_name clientcontact
host_name remote_host
use generic-contact
alias Nagios client
email remotehost@gmail.com
}
define contactgroup{
contactgroup_name groupname
host_name remote_host
alias Nagios group
members clientcontact,membersof remote_host
}
Next add more services to monitor remote host,for this:
define service{
use generic-service
host_name remote_host
service_description CPU Load
check_command check_nrpe!check_load
}
define service{
use generic-service
host_name remote_host
service_description HyperVM
check_command check_nrpe!check_http
}
define service{
use generic-service
host_name remote_host
service_description Procs
check_command check_nrpe!check_procs
}
define service{
use generic-service
host_name remote_host
service_description Zombie Processes
check_command check_nrpe!check_zombie_procs
}
define service{
use generic-service
host_name remote_host
service_description / Partition
check_command check_nrpe!check_disk1
}
define service{
use generic-service
host_name remote_host
service_description /storage partition
check_command check_nrpe!check_disk2
}
define service{
use generic-service
host_name remote_host
service_description Current Users
check_command check_nrpe!check_users
}
define service{
use generic-service
host_name remote_host_name
service_description controlpanel check
check_command check_tcp!-H $HOSTADDRESS$ -p 2082
}
define service{
use generic-service
host_name remote_host
service_description ssl
check_command check_nrpe!check_ssl
}
Restart nagios daemon
/etc/init.d/nagios restart
Remote Host Configuration:
Edit the nrpe configuration file and add the folowing lines:
vi /etc/nrpe.conf
command[check_pop]=/usr/local/nagios/libexec/check_pop -p 110 -4 -w 10 -c 20
command[check_imap]=/usr/local/nagios/libexec/check_imap -p 143 -4 -w 10 -c 20
command[check_smtp]=/usr/local/nagios/libexec/check_smtp -p 25 -4 -w 10 -c 20
command[check_http]=/usr/local/nagios/libexec/check_http -H 127.0.0.1 -w 5 -c 10
command[check_mysql]=/usr/local/nagios/libexec/check_tcp -p 3306 -w 10 -c 20
command[check_dns]=/usr/local/nagios/libexec/check_dns -H www.eglueweb.com
command[check_ftp]=/usr/local/nagios/libexec/check_ftp -w 10 -c 20
command[check_procs]=/usr/local/nagios/libexec/check_procs -w 150 -c 200
command[check_total_procs]=/usr/local/nagios/libexec/check_procs -w 150 -c 200
command[check_ping]=/usr/local/nagios/libexec/check_ping -H $ARG1$ -w $ARG2$ -c $ARG3$ -p 5
command[check_ssl]=/usr/local/nagios/libexec/check_tcp -H 67.228.194.218 -p 443
command[check_mailq]=/usr/local/nagios/libexec/check_exim -w 10 -c -20
restart the nrpe damon
/etc/init.d/nrpe restart
Define the remote host name in client.cfg
Edit /usr/local/nagios/etc/objects/remotehost.cfg and append the following lines:
define host{
use linux-box
host_name remote_host
address ipaddress of remote_host
check_command check-host-alive
contacts nagios admin,cliectcontact
}
Next define contact name and contact goup name inn same file
define contact{
contact_name clientcontact
host_name remote_host
use generic-contact
alias Nagios client
email remotehost@gmail.com
}
define contactgroup{
contactgroup_name groupname
host_name remote_host
alias Nagios group
members clientcontact,membersof remote_host
}
Next add more services to monitor remote host,for this:
define service{
use generic-service
host_name remote_host
service_description CPU Load
check_command check_nrpe!check_load
}
define service{
use generic-service
host_name remote_host
service_description HyperVM
check_command check_nrpe!check_http
}
define service{
use generic-service
host_name remote_host
service_description Procs
check_command check_nrpe!check_procs
}
define service{
use generic-service
host_name remote_host
service_description Zombie Processes
check_command check_nrpe!check_zombie_procs
}
define service{
use generic-service
host_name remote_host
service_description / Partition
check_command check_nrpe!check_disk1
}
define service{
use generic-service
host_name remote_host
service_description /storage partition
check_command check_nrpe!check_disk2
}
define service{
use generic-service
host_name remote_host
service_description Current Users
check_command check_nrpe!check_users
}
define service{
use generic-service
host_name remote_host_name
service_description controlpanel check
check_command check_tcp!-H $HOSTADDRESS$ -p 2082
}
define service{
use generic-service
host_name remote_host
service_description ssl
check_command check_nrpe!check_ssl
}
Restart nagios daemon
/etc/init.d/nagios restart
Remote Host Configuration:
Edit the nrpe configuration file and add the folowing lines:
vi /etc/nrpe.conf
command[check_pop]=/usr/local/nagios/libexec/check_pop -p 110 -4 -w 10 -c 20
command[check_imap]=/usr/local/nagios/libexec/check_imap -p 143 -4 -w 10 -c 20
command[check_smtp]=/usr/local/nagios/libexec/check_smtp -p 25 -4 -w 10 -c 20
command[check_http]=/usr/local/nagios/libexec/check_http -H 127.0.0.1 -w 5 -c 10
command[check_mysql]=/usr/local/nagios/libexec/check_tcp -p 3306 -w 10 -c 20
command[check_dns]=/usr/local/nagios/libexec/check_dns -H www.eglueweb.com
command[check_ftp]=/usr/local/nagios/libexec/check_ftp -w 10 -c 20
command[check_procs]=/usr/local/nagios/libexec/check_procs -w 150 -c 200
command[check_total_procs]=/usr/local/nagios/libexec/check_procs -w 150 -c 200
command[check_ping]=/usr/local/nagios/libexec/check_ping -H $ARG1$ -w $ARG2$ -c $ARG3$ -p 5
command[check_ssl]=/usr/local/nagios/libexec/check_tcp -H 67.228.194.218 -p 443
command[check_mailq]=/usr/local/nagios/libexec/check_exim -w 10 -c -20
restart the nrpe damon
/etc/init.d/nrpe restart
Friday, April 24, 2009
How to install and configure NRPE in Nagios
The NRPE addon is designed to allow you to execute Nagios plugins on remote Linux/Unix machines. The main reason for doing this is to allow Nagios to monitor "local" resources (like CPU load, memory usage, etc.) on remote machines. Since these public resources are not usually exposed to external machines, an agent like NRPE must be installed on the remote Linux/Unix machines.
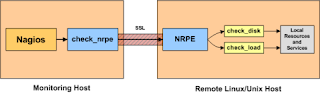
The NRPE addon consists of two pieces:
The check_nrpe plugin, which resides on the local monitoring machine
The NRPE daemon, which runs on the remote Linux/Unix machine
INSTALLATION:
Remote Host Setup:
Create a new nagios user account and give it a password.
/usr/sbin/useradd nagios
passwd nagios
Download nrpe and nagios-plugin.
wget http://osdn.dl.sourceforge.net/sourceforge/nagiosplug/nagios-plugins-1.4.11.tar.gz
tar xvzf nagios-plugins-1.4.11.tar.gz
cd nagios-plugins-1.4.11/
Compile and install the plugins.
./configure --prefix=/usr/local/nagios
make
make install
The permissions on the plugin directory and the plugins will need to be fixed at this point, so run the following commands.
chown nagios.nagios /usr/local/nagios
chown -R nagios.nagios /usr/local/nagios/libexec
Install the NRPE daemon
Download the source code tarball of the NRPE addon (visit http://www.nagios.org/download/ for links to the latest versions) and execute:
mkdir ~/downloads
cd ~/downloads/
wget http://osdn.dl.sourceforge.net/sourceforge/nagios/nrpe-2.12.tar.gz
tar xzf nrpe-2.12.tar.gz
cd nrpe-2.12/
Compile the NRPE addon.
./configure
make all
Install the NRPE plugin (for testing), daemon, and sample daemon config file.
make install-plugin
make install-daemon
make install-daemon-config
Add the following entry for the NRPE daemon to the/etc/services file.
nrpe 5666/tcp# NRPE
Next we have to add init script for nrpe.For this,
cd nrp-2.12/
cp ./src/nrpe /usr/sbin/
cp ./sample-config/nrpe.cfg /etc /
NrpeCfg=/etc/nrpe.cfg
Then restart nrpe services
Next you have to edit the nrpe configuration file and allow the monitoring of host ipaddress with:
vi /etc/nrpe.cfg
allowed_hosts=127.0.0.1,ipaddress of monitoring host
Then open nrpe port in the remote server firewall. Here I am using apf firewall.
vim /etc/apf/conf.apf
edit the follwing section and add port number 5666
IG_tcp_cports="5666,20...........etc"
restart the services
Monitoring Host Setup
We have to install nrpe plugin to the monitoring host.
cd ~/downloads
wget http://osdn.dl.sourceforge.net/sourceforge/nagios/nrpe-2.12.tar.gz
tar xzf nrpe-2.12.tar.gz
cd nrpe-2.12/
Compile the NRPE addon.
./configure
make all
Install the NRPE plugin.
make install-plugin
Create a command definition
and add the following definition to the file:
define command{
command_name check_nrpe
command_line $USER1$/check_nrpe -H $HOSTADDRESS$ -c $ARG1$
}
Now you can add services to your system for monitoring them in the remote system.
You can insert each remote system services in one file.For that you have to edit the configuration file
vim /usr/local/nagios/etc/nagios.cfg
and append the following line.
cfg_file=/usr/local/nagios/etc/objects/remotehost.cfg
Before adding services, create a new template for each different type of host you'll be monitoring. Let's create a new template for linux boxes.
vi /usr/local/nagios/etc/objects/templates.cfg
add the following lines.
define host{
name linux-box ; Name of this template
use generic-host ; Inherit default values
check_period 24x7
check_interval 5
retry_interval 1
max_check_attempts 10
check_command check-host-alive
notification_period 24x7
notification_interval 30
notification_options d,r
contact_groups admins
register 0 ; DONT REGISTER THIS - ITS A TEMPLATE
}
define host{
use linux-box ; Inherit default values from a template
host_name remotehost ; The name we're giving to this server
alias Fedora Core 6 ; A longer name for the server
address 192.168.0.1 ; IP address of the server
contact_name remote
use generic-contact
alias Nagios client
email remotehost@gmail.com
}
The following service will monitor the CPU load of the remote host. The "check_load" argument that is passed to the check_nrpe command definition tells the NRPE daemon to run the "check_load" command as defined in the
nrpe.cfg file.
define service{
use generic-service
host_name remotehost
service_description CPU Load
check_command check_nrpe!check_load
}
The following service will monitor the the number of currently logged in users on the remote host.
define service{
use generic-service
host_name remotehost
service_description Current Users
check_command check_nrpe!check_users
}
The following service will monitor the free drive space on /dev/hda1 on the remote host.
define service{
use generic-service
host_name remotehost
service_description /dev/hda1 Free Space
check_command check_nrpe!check_hda1
}
The following service will monitor the total number of processes on the remote host.
define service{
use generic-service
host_name remotehost
service_description Total Processes
check_command check_nrpe!check_total_procs
use generic-service
host_name remotehost
service_description Zombie Processes
check_command check_nrpe!check_zombie_procs
}
Remote Host Configuration
You have to insert the following command definitions in /etc/nrpe.conf
command[check_users]=/usr/local/nagios/libexec/check_users -w 5 -c 10
command[check_load]=/usr/local/nagios/libexec/check_load -w 15,10,5 -c 30,25,20
command[check_hda1]=/usr/local/nagios/libexec/check_disk -w 20% -c 10% -p /dev/hda1
command[check_zombie_procs]=/usr/local/nagios/libexec/check_procs -w 5 -c 10 -s Z
Then restart the nrpe daemon
/etc/init.d/nrpe restart

The NRPE addon consists of two pieces:
The check_nrpe plugin, which resides on the local monitoring machine
The NRPE daemon, which runs on the remote Linux/Unix machine
INSTALLATION:
Remote Host Setup:
Create a new nagios user account and give it a password.
/usr/sbin/useradd nagios
passwd nagios
Download nrpe and nagios-plugin.
wget http://osdn.dl.sourceforge.net/sourceforge/nagiosplug/nagios-plugins-1.4.11.tar.gz
tar xvzf nagios-plugins-1.4.11.tar.gz
cd nagios-plugins-1.4.11/
Compile and install the plugins.
./configure --prefix=/usr/local/nagios
make
make install
The permissions on the plugin directory and the plugins will need to be fixed at this point, so run the following commands.
chown nagios.nagios /usr/local/nagios
chown -R nagios.nagios /usr/local/nagios/libexec
Install the NRPE daemon
Download the source code tarball of the NRPE addon (visit http://www.nagios.org/download/ for links to the latest versions) and execute:
mkdir ~/downloads
cd ~/downloads/
wget http://osdn.dl.sourceforge.net/sourceforge/nagios/nrpe-2.12.tar.gz
tar xzf nrpe-2.12.tar.gz
cd nrpe-2.12/
Compile the NRPE addon.
./configure
make all
Install the NRPE plugin (for testing), daemon, and sample daemon config file.
make install-plugin
make install-daemon
make install-daemon-config
Add the following entry for the NRPE daemon to the/etc/services file.
nrpe 5666/tcp# NRPE
Next we have to add init script for nrpe.For this,
cd nrp-2.12/
cp ./src/nrpe /usr/sbin/
cp ./sample-config/nrpe.cfg /etc /
cat init-script.in > /etc/init.d/nrpe
mod a+x /etc/init.d/nrpe
open the /etc/init.d/nrpe file and edit lines:
NrpeCfg=/etc/nrpe.cfg
Then restart nrpe services
/etc/init.d/nrpe restart
Next you have to edit the nrpe configuration file and allow the monitoring of host ipaddress with:
vi /etc/nrpe.cfg
allowed_hosts=127.0.0.1,ipaddress of monitoring host
Then open nrpe port in the remote server firewall. Here I am using apf firewall.
vim /etc/apf/conf.apf
edit the follwing section and add port number 5666
IG_tcp_cports="5666,20...........etc"
restart the services
/etc/init.d/apf restart
Make sure the nrpe daemon is running under xinetd.
The output of this command should show something like this:
Monitoring Host Setup
We have to install nrpe plugin to the monitoring host.
cd ~/downloads
wget http://osdn.dl.sourceforge.net/sourceforge/nagios/nrpe-2.12.tar.gz
tar xzf nrpe-2.12.tar.gz
cd nrpe-2.12/
Compile the NRPE addon.
./configure
make all
Install the NRPE plugin.
make install-plugin
Create a command definition
You'll need to create a command definition in one of your Nagios object configuration files in order to use the check_nrpe plugin. Open the sample commands.cfg file for editing...
vi /usr/local/nagios/etc/commands.cfg
and add the following definition to the file:
define command{
command_name check_nrpe
command_line $USER1$/check_nrpe -H $HOSTADDRESS$ -c $ARG1$
}
Now you can add services to your system for monitoring them in the remote system.
You can insert each remote system services in one file.For that you have to edit the configuration file
vim /usr/local/nagios/etc/nagios.cfg
and append the following line.
cfg_file=/usr/local/nagios/etc/objects/remotehost.cfg
Before adding services, create a new template for each different type of host you'll be monitoring. Let's create a new template for linux boxes.
vi /usr/local/nagios/etc/objects/templates.cfg
add the following lines.
define host{
name linux-box ; Name of this template
use generic-host ; Inherit default values
check_period 24x7
check_interval 5
retry_interval 1
max_check_attempts 10
check_command check-host-alive
notification_period 24x7
notification_interval 30
notification_options d,r
contact_groups admins
register 0 ; DONT REGISTER THIS - ITS A TEMPLATE
}
Next you have to edit /usr/local/nagios/etc/objects/remotehost.cfg and add the following definitions and services
define host{
use linux-box ; Inherit default values from a template
host_name remotehost ; The name we're giving to this server
alias Fedora Core 6 ; A longer name for the server
address 192.168.0.1 ; IP address of the server
}
Then, define a new contact for the remote Linux/Unix box that references the generic-contact template.
contact_name remote
use generic-contact
alias Nagios client
email remotehost@gmail.com
}
The following service will monitor the CPU load of the remote host. The "check_load" argument that is passed to the check_nrpe command definition tells the NRPE daemon to run the "check_load" command as defined in the
nrpe.cfg file.
define service{
use generic-service
host_name remotehost
service_description CPU Load
check_command check_nrpe!check_load
}
The following service will monitor the the number of currently logged in users on the remote host.
define service{
use generic-service
host_name remotehost
service_description Current Users
check_command check_nrpe!check_users
}
The following service will monitor the free drive space on /dev/hda1 on the remote host.
define service{
use generic-service
host_name remotehost
service_description /dev/hda1 Free Space
check_command check_nrpe!check_hda1
}
The following service will monitor the total number of processes on the remote host.
define service{
use generic-service
host_name remotehost
service_description Total Processes
check_command check_nrpe!check_total_procs
}
The following service will monitor the number of zombie processes on the remote host.
use generic-service
host_name remotehost
service_description Zombie Processes
check_command check_nrpe!check_zombie_procs
}
Remote Host Configuration
You have to insert the following command definitions in /etc/nrpe.conf
command[check_users]=/usr/local/nagios/libexec/check_users -w 5 -c 10
command[check_load]=/usr/local/nagios/libexec/check_load -w 15,10,5 -c 30,25,20
command[check_hda1]=/usr/local/nagios/libexec/check_disk -w 20% -c 10% -p /dev/hda1
command[check_zombie_procs]=/usr/local/nagios/libexec/check_procs -w 5 -c 10 -s Z
Then restart the nrpe daemon
/etc/init.d/nrpe restart
Thursday, April 23, 2009
How to setup and configure nagios

Nagios
Nagios is a popular open source computer system and network monitoring software application. It watches hosts and services, alerting users when things go wrong and again when they get better.It allows you to gain insight into your network and fix problems before customers know they even exist. It's stable, scalable, supported, and extensible. Most importantly, it works.
It will do the Comprehensive Network Monitoring in the following
* Windows
* Linux/Unix
* Routers, Switches, Firewalls
* Printers
* Services
* Applications
Installation of Nagios in localhost
Before installing nagios,you have to install the following packages
* Apache
* GCC compiler
* GD development libraries
if you are using rpm based packages,
yum install httpd
yum install gcc
yum install glibc glibc-common
yum install gd gd-devel
If you are using ubuntu,
sudo apt-get install apache2
sudo apt-get install build-essential
sudo apt-get install libgd2-xpm-dev
1) Create Account Information
Create a new nagios user account and give it a password.
/usr/sbin/useradd -m nagios
passwd nagios
Create a new nagcmd group for allowing external commands to be submitted through the web interface. Add both the nagios user and the apache user to the group.
/usr/sbin/groupadd nagcmd
/usr/sbin/usermod -a -G nagcmd nagios
/usr/sbin/usermod -a -G nagcmd apache(or www-data)
2) Download Nagios and the Plugins
mkdir ~/downloads
cd ~/downloads
for downloading Nagios click here
or in terminal type the following line
wget http://osdn.dl.sourceforge.net/sourceforge/nagios/nagios-3.0.2.tar.gz
Extract the Nagios source code tarball.
tar xvzf nagios-3.0.2.tar.gz
cd nagios-3.0.2
Run the Nagios configure script, passing the name of the group you created earlier like so:
./configure --with-command-group=nagcmd
3) Compile the Nagios source code.
make all
Install binaries, init script, sample config files and set permissions on the external command directory.
make install
make install-init
make install-config
make install-commandmode
4) Configure the Web Interface
Install the Nagios web config file in the Apache conf.d directory.
make install-webconf
Create a nagiosadmin account for logging into the Nagios web interface. Remember the password you assign to this account - you’ll need it later.
htpasswd -c /usr/local/nagios/etc/htpasswd.users nagiosadmin
If you want to add more users then
htpasswd /usr/local/nagios/etc/htpasswd.users username
Edit the file in /usr/local/apache/conf/includes/pre_virtualhost_global.conf and append the following line in to the virtual host directoriesAuthName "Nagios Access"
AuthType Basic
AuthUserFile /usr/local/nagios/etc/htpasswd.users
Require valid-user
/etc/init.d/apache2 restart(or service httpd restart)
5) Download, Compile and Install the Nagios Plugins
For downloading Nagios-plugins click here
or in terminal we can download using the wget command,its shown below:
wget http://osdn.dl.sourceforge.net/sourceforge/nagiosplug/nagios-plugins-1.4.11.tar.gz
cd ~/downloads
tar xvzf nagios-plugins-1.4.11.tar.gz
cd nagios-plugins-1.4.11/
Compile and install the plugins.
./configure --with-nagios-user=nagios --with-nagios-group=nagios
make
make install
6) Start Nagios
Configure Nagios to automatically start when the system boots.
ln -s /etc/init.d/nagios /etc/rcS.d/S99nagios
Verify the sample Nagios configuration files.
/usr/local/nagios/bin/nagios -v /usr/local/nagios/etc/nagios.cfg
If there are no errors, start Nagios.
/etc/init.d/nagios start (service nagios start)
Add Nagios to the list of system services and have it automatically start when the system boots.
chkconfig --add nagios
chkconfig nagios on
you can check the Nagios in your browser typing the following url:
http://localhost/nagios
You should now be able to access the Nagios web interface at the URL below. You'll be prompted for the username (nagiosadmin) and password you specified earlier.
Installation and configuration of of Nagios with NRPE for both remote hosts and local host will be posted on next session
Subscribe to:
Posts (Atom)


